
New Zealand is easily one of the most beautiful places I’ve ever explored. It has it all—rugged coastlines, epic mountains, vibrant blue water, endless fjords… I could go on and on. It’s a paradise for hikers, mountain lovers, roadtrippers and all around outdoor fanatics.

*If you’re looking for my hiking and camping gear suggestions from REI, please scroll to the bottom of the post!*
Four years ago, I was in South East Asia and a friend and I decided to go to New Zealand on a whim. We bought last minute flights, booked a random bus pass to get around the country and spent the next month exploring with absolutely no plans. The bus pass we had allowed us to hop on and hop off whenever we wanted and helped us meet a lot of people. I had the time of my life, but I couldn’t shake the feeling that there had to be a better way of seeing New Zealand. At the end of our trip, my friend and I, and two new friends from the UK, decided to rent a campervan for a few days in lieu of the bus. We drove to Mount Cook National Park and these few days were easily the best of the entire trip. In that moment, I knew I had to get back to New Zealand and do a proper roadtrip someday. Fast forward to 2020, I finally got the chance to do just that!
I want to start by saying that there are so many spots to check out in New Zealand. Before I went on my trip, I researched and pinpointed 20-30 locations. Once I got there, the team and I followed the weather and chose locations based on that. Unfortuently, about a month before I arrived to the South Island, there was a huge flood in Milford Sound. Check out this article if you’d like to read more about it. There were so many hikes based out of this area that I couldn’t get to, which was a bummer, but I’m just going to use that as another reason to return. Below are all of the spots I went to on my trip and each one is incredibly epic.
How to get to the South Island
Here are a few options for you, starting with what I did:
- From personal experience, flying into Auckland, then into Christchurch is the cheapest way to get to bottom of the South Island. There are also a lot of campervan companies that are based out of Christchurch which is helpful.
- You could fly into Auckland (the cheapest airport hub in New Zealand), rent a car or campervan and drive down to the South Island (via the Wellington to Picton ferry). This obviously would take longer, but would be a great option if you’d like to explore the entire country and you have more time.
- You could fly straight to Queenstown or Wanaka, which are great cities to base yourself out of if you want to hit the spots below. Usually, the flights, rental cars and campervans are more expensive and less abundant.
Which campervan company you should roll with
I’ll be the first to say that there are a crazy amount of campervan companies that operate in New Zealand. For good reason though, the country is set up for the best vanlife experience! There are free and paid campsites everywhere, spots with everything you need (water, dump stations, garbage, recycling, showers, etc.) and apps to help you find all of these things easily. I’m stoked to save you a lot of time and research and say that Mad Campers is the company you want to roll with. They are based in both Auckland and Christchurch and will ensure your trip goes as smoothly as possible. The rad people behind Mad Campers share local advice, help plan your trip, provide hike suggestions, have thought about every little detail when building out and stocking their vans. The vans themselves are easy to drive, modern and sleek. All you need to do is book with them and show up! Click here to check availability and book your own trip.


Alex Knobb
This is a hike is on the West Coast of New Zealand—a part of the country that is known for its rivers and rainforests, glaciers and geological treasures. This hike in particular zigzags through an incredible rainforest that ends up at a point with an unobstructed view of the Franz Josef Glacier. Looking at photos before this hike, I had high expectations—and once I got up there, each and one of those expectations were met. You can find the hike details on AllTrails.


Blue Pools
I’m going to start by saying that this water is incredibly cold. If you’re not used to swimming in glacial water, please ease into the water if you’re keen on a dip. This spot is also on the west coast of New Zealand and is an easy stroll through a forest. Although it’s self explanatory once you roll into the parking lot, details on the trail can be found on AllTrails. You’ll get to a swing bridge that crosses the Makarora River, which is what I swam in. You’ll probably see people jumping into the water from the bridge, so don’t be alarmed if you do—it’s a well-known jumping spot.

Roys Peak
If you find yourself in Wanaka, which I am almost certain that you will, you need to head up to Roy’s Peak. After a few hour climb up a well trafficked path, you’ll be rewarded with incredible views over Lake Wanaka, Mount Aspiring and endless peaks. This is a must-do! Hike details can be found on AllTrails.

Milford Sound
Milford Sound is a fjord that has rainforests and waterfalls cascading down the huge mountains—for this reason, going on a rainy day is the best. While we were in New Zealand, the road leading to Milford Sound (State Highway 94), that was previously closed due to severe flooding, opened but only to tour buses. While I wanted to be able to drive in myself and explore, I took what I could get and ended up booking a spot to get a ride in. It was worth it! I booked a boat tour with Go-Orange.


Hooker Valley track
If you’re in Aoraki/Mt Cook National Park and are looking for something chill to do, hiking Hooker Valley is what you want. It is an easy walk along the Hooker River that’ll take you over three swingbridges, along picturesque pathways and to Hooker Lake. You’ll be pulling out your camera every few steps on this one. Trail info can be found on AllTrails.

Lake Pukaki
This lake is one of the biggest on New Zealand’s South Island and the water of the lake is an incredible, bright turquoise colour! Your jaw will drop when you see it, especially when the sun is out and hitting the lake. The bright colour is due to glacial flour which is made from extremely fine rock particles which have come from the surrounding glaciers. I suggest driving along side Lake Pukpaki and pulling over at random spots to spend the day. Mike and I randomly found this spot on the lake and we had had it all to ourselves.

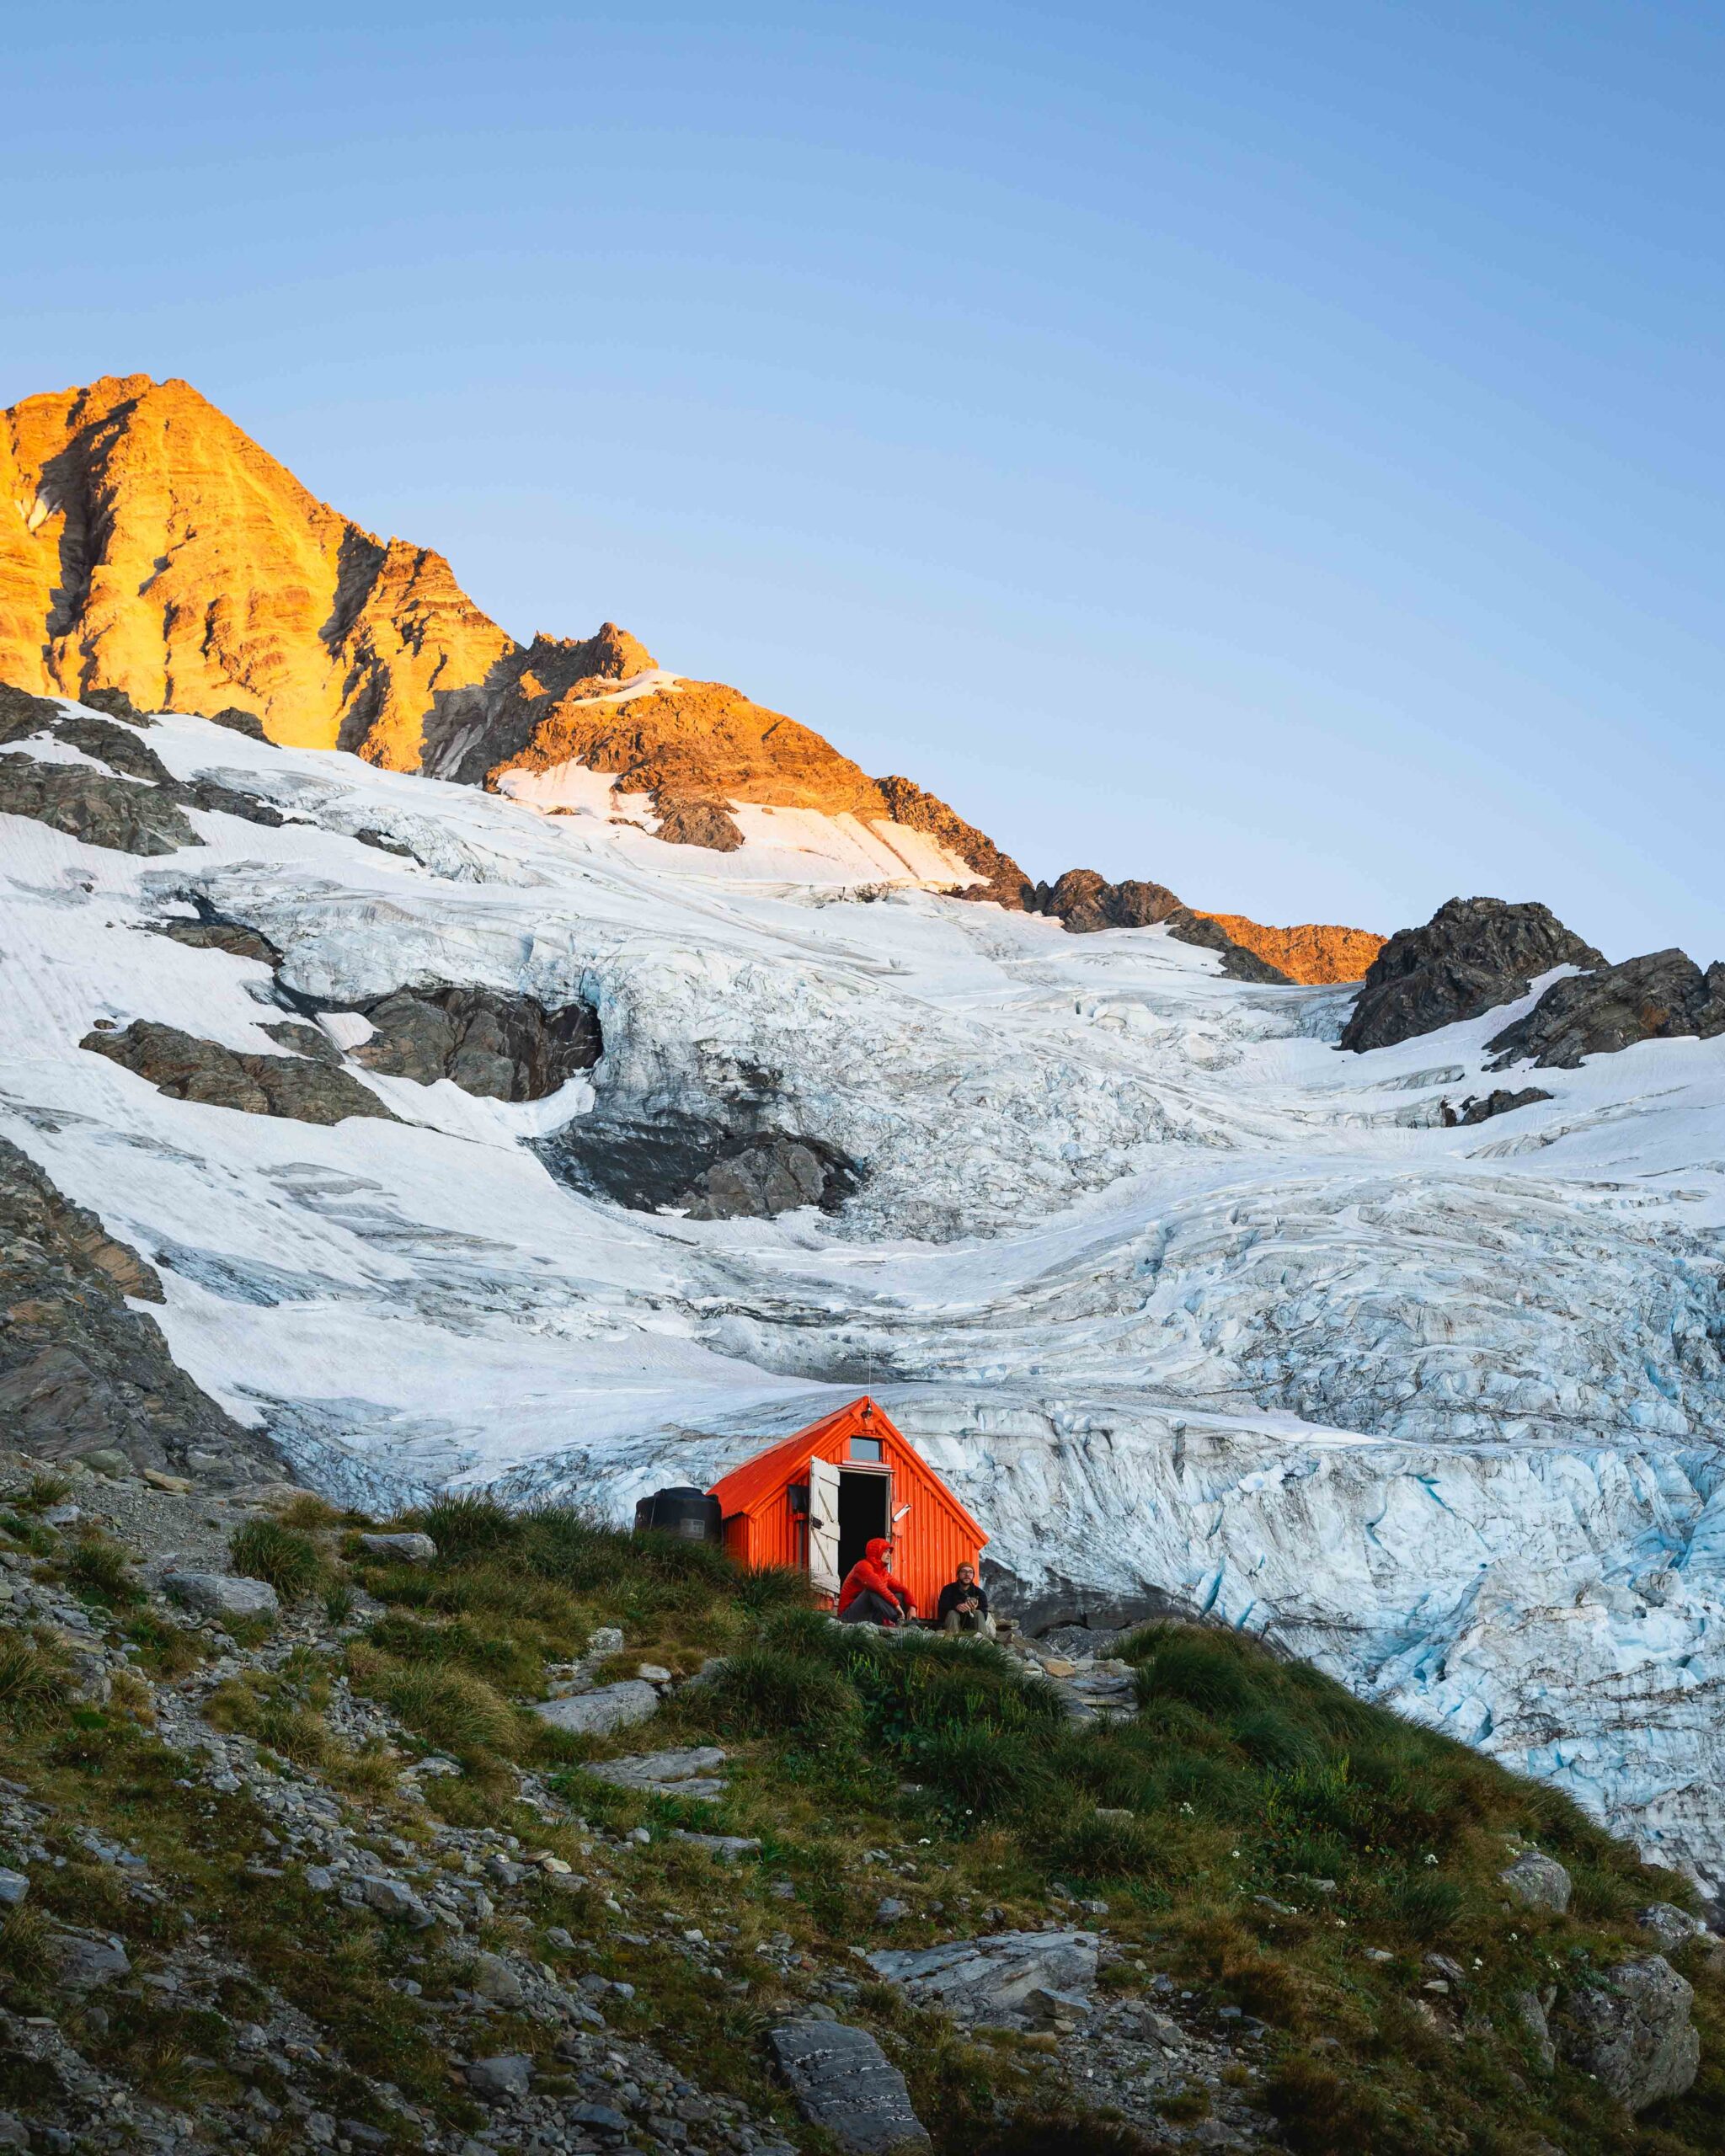
Mueller Hut
Ah, Mueller Hut. This is one of the hikes I did on my first trip to New Zealand and it blew my mind. I had no idea how impressive the views really were until I was up there. If you want to camp, before you hike you’ll need to stop by the visitor center in Mount Cook to chat with a ranger. They’ll tell you if you can get a spot in the hut or if you can freedom camp. I chose to camp as I prefer it (plus, the hut was already full!). The hike itself isn’t easy, but remember these words when you’re doing it… it is worth it. The first half of the trail is straight up stairs to Sealy Tarns, which is a great spot for a water break and snack. The trail then becomes loose rock and zig zags up the mountain. One way, the trail is about 5.2km with 1050m of elevation gain (3.2miles with 3500ft) . It took me, with an overnight pack on, about 3-4 hours one way. We ended up being the only squad camping which made the experience really special. We set up our tents, got water from the hut, cooked dinner, snapped a few photos and had a good night sleep before waking up for sunrise. This experience alone immediately justified me lugging my camping gear with me from home. Trail info can be found on AllTrails.


Rocky Mountain Summit
This is a lesser-known hike in the Wanaka area and it’s incredible! After about a 2 hour hike, you’ll see insane views of Mount Aspiring, Roy’s Peak and, of course, Lake Wanaka. I suggest hiking up for sunrise or early morning light. It’s an incredible way to start your day. It’s a loop trail and we took the east route to get up to Rocky Mountain Summit. Check out the hike on AllTrails.

Tasman Lake
If you’re looking to take it easy, this is a great spot! This is a very easy hike for all abilities that goes along a wide gravel trail. You’ll be rewarded with views over Tasman Lake and Tasman Glacier. In the colder months, there are icebergs in the water. I visited New Zealand in late summer/early fall, so I didn’t see any, but it was still beautiful. This is another self-explanatory walk but you can check it out on AllTrails if you’d like!

Aoraki/Mount Cook National Park
Now, you may be wondering… why is Angela telling us to go to Aoraki/Mount Cook National Park when she’s already been talking about specific hikes in the park like Mueller Hut, Hooker Valley and Tasman Lake? Well, it’s because I want to tell you that being in this park in general is an amazing experience. The road to Mount Cook (State Highway 80) has incredible views and I suggest stopping at Peter’s Lookout and random at pullouts along the way. It’s incredible to see Lake Pukaki beside you and Mount Cook in front of you.

Quick TIPS ON PACKING
Packing for a New Zealand road trip, whether you’re planning on camping or not, is quite tough. Certain areas of the South Island have different climates and like any other mountainous region, weather changes very quickly. No fear though, here are a few tips:
- Layering your clothing is key to stay warm, dry, and comfortable.
- Going on this trip with a friend or two is helpful because you can all pool your resources and don’t need to bring one of everything. For example, I didn’t bring a camp stove because Mike brought one for us and I brought the two-person tent.
Buy your food and fuel to cook with in New Zealand. I’ve packed all my snacks and food with me from home and brought them overseas to a trip like this and the heavy luggage and extra fees aren’t worth the hassle.
Try to pack a luggage that is long and narrow so your backpacking bag (pack this empty and flat) can fit nicely in it. This is a great option
Quick tips on building your perfect camping set up without breaking the bank
- Buy gear that lasts. If you buy gear from brands you can depend on, you will save money in the long run because it’ll last for years. Should anything go wrong with your gear, many of these companies offer repairs (ie. REI, Osprey, Patagonia, Arc’teryx, MSR, Marmot and more). I’ve had the same MSR tent and cooking stove, Danner boots, Marmot sleeping bag, Therm-A-Rest sleeping pad and Osprey backpack for YEARS! I’ll link all of these items below.
Buy at the right place. I recommend getting a membership at REI so you can shop many of these brands all in one place. For a one-time $20 fee, you’ll get member-only coupons/discounts and, my favourite part, 10% of your money back on all full-priced purchases to spend on future gear. If you’re going to be spending the money anyways, you might as well spend it at a place where they give you a portion of your money back—this is seriously a no brainer in my books.
- If you can, buy at the right time—like at REI’s Anniversary Sale which is live from May 15-25, 2020.

Below is small list of my must-haves! I will share if an item is on sale right now at REI, but if it isn’t no worries—REI members save 20% on one eligible full-price item with code ANNV20 from now until May 25th. If you’re not a member, now is the time to sign up!
Gear:
TENT‣ I’ve been backpacking with the MSR Hubba Hubba for over 2 years and I love it. It only weighs 3lbs, can be set up within a few minutes and is spacious for two people. This tent is on sale until May 25th so if you’ve been eyeing it, now is the time to snag it because you’ll save over $110.
SLEEPING PAD‣ The Therm-a-Rest NeoAir Xterm Sleeping Pad is unisex and keeps me really warm as it’s high off the ground!
SLEEPING BAG‣ I use the Marmot Ouray 0 Sleeping Bag and a comparable bag for men is the Marmot Never Summer 0 Sleeping Bag. They both have 650-fill-power duck down, are water-repellent and have 0F (-18C) rating. These sleeping bags are great for winter, fall and spring, but are a little on the warm side for the summer. I use this sleeping bag all-year round, but if you’d like you could purchase a summer sleeping bag specifically for the warmer months. The Marmot Hydrogen 30 Sleeping Bag (Unisex) is a great option as it packs down very well, weighs under 2lbs and is rated 30F (-1C).
CAMP PILLOW‣ I didn’t think a camp pillow was necessary for backpacking because I always used a sweater under my head, but this is easily one of the best purchases I’ve made. The Sea to Summit Aeros Premium Pillow is inexpensive, incredibly light and small. It’ll completely change the way you sleep!
CAMPING STOVE‣ I have used the MSR WindBurner Stove System for years. It weighs only 15oz, boils water in 3-4 minutes and packs well. That said, from now until May 25th, the Jetboil Flash Cooking System is 25% off. I’ve used this set up over the years as many friends of mine own it. It’s identical to the MSR stove so if you’re keen on saving over $80, I’d go for this one.
BACKPACKING BAG‣ I bought my first Osprey 65L backpack 6 years ago and since then I swear by these bags for backpacking. I just bought the Osprey Ariel AG 65 Pack and can’t recommend it to you enough! There are some awesome features but the most notable is that the top part of the bag turns into a small day bag. This is great for if you’re on an overnight or multi-day trip and want to go explore the area without taking all your gear. Another great thing about Osprey is that if something happens to your bag, they will fix (or replace) it. The men’s version is called the Osprey Aether AG 60 Pack. These packs are 25% off right now until May 25!
WATER BOTTLE‣ New Zealand has some of the best drinking water, so for this trip I would take something like the Hydro Flask Standard-Mouth Water Bottle for the airport/roadtrip part of the trip and the REI Co-op Nalgene (which is 54% off!!) and Osprey Hydraulics LT Reservoir (which is 25% off) for hiking/backpacking. If you would like to purify your water, you can use the Katadyn Micropur Purification Tablets (which are 25% off) or bring the Grayl Ultralight Compact Purifier Bottle with you.
INSULATED MUG‣ I bring the Hydro Flask Coffee Mug with me on every camping trip. It keeps my coffee hot as I take in the views—where ever I may be.
HEADLAMP‣ I bought the BioLite HeadLamp 330 two years ago and it has been the best headlamp I’ve ever tried. It’s rechargeable, lightweight and perfect for men and women.
Clothing/Footwear:
HIKING BOOTS‣ I have tried four brands in the last five years and the Danner Mountain 600 Mid WP Hiking Boots (Women’s) are my all-time favourite! They are incredibly comfortable and lightweight. For the men’s version please see this link: Danner Mountain 600 Mid WP Hiking Boots (Men’s). Whenever I’m on a trail, I constantly see this boot on both men and women.They both are 25% off until May 25th. If I could only choose one thing to buy at this sale, these boots would be it.
SANDALS‣I honestly can’t figure out which pair I like more, the Teva Original Universal Sandals (Women’s) or Chaco Z/1 Classic Sandals (Women’s). Apologies if that’s not very helpful… but both of these sandals are winners! Here are the male equivalents: Teva Original Universal Sandals (Men’s) and Chaco Z/1 Classic Sandals (Men’s).
BASE LAYER‣ I have the REI Co-op Merino Midweight Base Layer Top (Women’s) in black and love wearing it while I hike. This fabric wicks moisture and dries quickly to keep you comfortable. The men’s version, REI Co-op Midweight Base Layer Crew Top (Men’s), is well-loved by my male friends.
INSULATED LAYERS‣ I always bring two warm layers with me on camping adventures—even in the summer months! I’ll be sharing my personal favourites for women and what my male friends use and love for men. The first layer is a fleece like, Patagonia Re-Tool Snap-T Pullover (Women’s) or Patagonia Better Sweater Fleece Jacket (Men’s) (30% off right now). The second layer is always a down jacket. I’ve had a Arc’teryx Cerium LT Down Hoodie (Women’s) for years and I’ll tell you right now that it’s worth the price. It’ll last you decades and you can get your gear fixed or replaced by Arc’teryx if needed. For men, check out the Arc’teryx Cerium LT Down Hoodie (Men’s). Both puffies are 25% off—which is so rare for Arc’teryx—so I’d buy now if I were you!
RAIN JACKET‣ The Arc’teryx Zeta SL Rain Jacket (Women’s) (25-40% off!!) and Arc’teryx Zeta SL Rain Jacket (Men’s) (25-30% off!!) are incredible rain jackets for both women and men. They are on the expensive end of the spectrum but will last you so incredibly long. This price is 100% worth it in my opinion.
SOCKS‣ The REI Co-op Merino Wool Lightweight Hiking Crew Socks are the best I’ve ever used. These are perfect summer-weight hiking socks because they’re naturally breathable, sweat wicking, quick-drying and odor-resistant. For the colder months, check out the REI Co-op Merino Wool Expedition Hiking Crew Socks.
HAT‣ The Patagonia P-6 Label Trad Cap is a classic staple for me!
Note: there are affiliate links in this post and I may earn a small commission if you choose to purchase an item (at no additional cost to you). These funds go right back into creating content just like this and support my small business.
Thanks Angela! I am New Zealand based and am just now trying to get started with adventure photography. For a Kiwi, your list was fab for helping me brainstorm great spots & the right gear to get started! Hope you manage to get up to some of the North Island tramps on your next visit!
Hi Beth,
Thanks so much for the kind words and comment. I’m so stoked you liked the post! You live in an incredible country and I am excited for you to get started with photography. NZ is a good place to practice 😉
-Angela ◡̈
I really like your blog.. very nice colors & theme. Did you design this website yourself or did you hire someone to do it for you? Plz answer back as I’m looking to construct my own blog and would like to find out where u got this from. thanks
Thanks so much! Glad you enjoy it. I hired Gariele from Dreamworthy Designs to design my website.
Hi Angela! I’m not sure if you’ll see this comment, but here goes nothing 🙂 What time of year did you go for the photos in this blog post? Thank you!
Hey Sasha! I went in April so NZ’s early fall.